Chapter 22 Extending use cases of GLM
In the previous chapter, we used count data (bounded at 0 and integer-valued) to understand how generalised linear models work. This chapter extends our understanding by looking at another data type: binomial data.
22.1 Binomial response data
There are three common formats for representing binomial data, all of which involve the fundamental concepts of “success” and “failure.” It is up to you, the modeller, to define what constitutes a success or failure. These can be any data that can be grouped into two discrete categories, such as pass/fail, survived/died, presence/absence, yes/no, male/female, red/green.
The three formats provide flexibility for modelling binomial data in various contexts:
Binary Data (0/1): The data can be a two-level factor, often coded as zeros and ones. For example, this could represent whether an individual died (0) or survived (1) in a study, or two sexes (male or female) in a study predicting sex based on other variables (e.g., size, morphology).
Proportions: The data can be a numeric vector of proportions bounded between 0 and 1. For instance, the proportion of individuals in a group that survive some event can be represented this way. In such cases, the total number of trials contributing to the proportion can be included as
weightsin the regression model, ensuring that points representing larger sample sizes have more influence.Success/Failure Counts (Two-Column Matrix): The data can be expressed as a two-column matrix, where the first column gives the number of “successes” and the second gives the number of “failures.” For example, 25 successes and 15 failures in a study can be represented as
cbind(successes, failures). This format is commonly used when raw counts are available.
The aim of a generalized linear model (GLM) for binomial data is usually to estimate the probability of “success” (e.g., survival, passing, scoring a goal, presence). The predicted response (fit of the model) is a value between 0 and 1 on the natural scale, which can be interpreted as the probability of success.
To achieve this, binomial GLMs commonly use the logit link function, which transforms probabilities (\(p\)) from the range (0, 1) to the range \((- \infty, \infty)\). This transformation linearises the S-shaped relationship between predictors and probabilities, allowing a linear regression line to be fitted. This type of regression is known as logistic regression.
The logit transformation is defined as:
\[ y = \log\left(\frac{p}{1-p}\right), \]
where \(p\) is the probability of success. Its inverse, the anti-logit, maps linear predictions (\(y\)) back to probabilities and is defined as:
\[ p = \frac{\exp(y)}{1 + \exp(y)}. \]
This transformation enables logistic regression to handle binary or proportional data effectively, with predictions that are interpretable as probabilities (e.g., of survival, success, or presence).
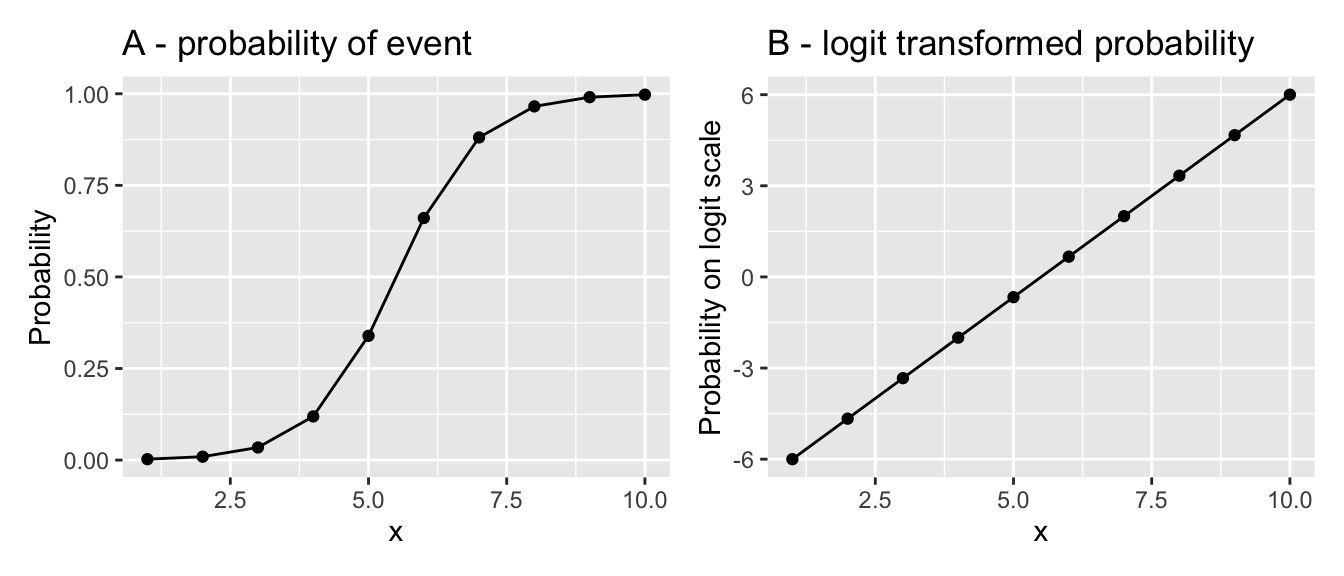
We could linearise the data and then fit an ordinary linear model using lm, but (like with Poisson regression) the other assumption of the ordinary linear model, homoscedasticity, would cause problems. With S-shaped binomial relationships, the expected variance is small at the two ends of the range and large in the middle. This contrasts strongly with the constant variance assumption of ordinary linear models. Therefore it is wise to account for this using a Generalised Linear Model that explicitly models this variance structure.
Let’s try a couple of examples.
Remember to load the dplyr, magrittr and
ggplot packages, and to set your working directory
correctly.
22.2 Example: NFL field goals
In this example you will be dealing with binary data (0/1, failure/success) from the American National Football League (NFL). The data are a record of field goals, which are a relatively rare method of scoring where someone kicks the ball over the crossbar and through the uprights of the goal during play.
Our aim is to estimate how the probability of success changes with distance from the goal. We already have a good idea that success probability will decline with increasing distance! But at what rate does the probability decline? And at what distance is there a probability of 0.5 (i.e. 50% chance of success)?
First, import the data and convert the distance from yards to meters.
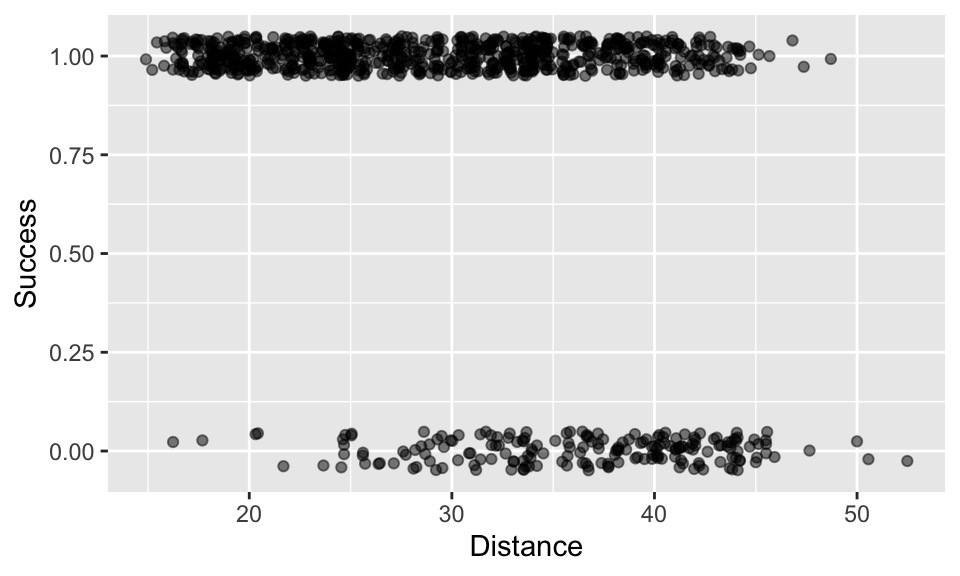
Next, plot the data with ggplot (geom_jitter would be a good option, but you might like to adjust the height and alpha arguments, e.g. geom_jitter(height = 0.05,alpha = 0.5)). You can see that the data are distributed in two bands with 1 representing success and 0 representing failure.
Now we can fit a GLM using an appropriate binomial error structure.
As is standard practice, we begin by examining the model diagnostics. In this case, they look quite problematic. One common reason for poor diagnostics (e.g., a skewed Q-Q plot) is the omission of important variables in the model. For example, the unusual patterns observed here might be due to missing key information about other aspects of the game, such as whether the team was winning or losing, the time remaining in the game, or the player’s level of experience.
However, another significant reason for the odd patterns in these diagnostic plots is their inherent limitations when applied to logistic regression. These plots were originally designed for linear models with normally distributed errors and may provide misleading results when used with logistic regression.
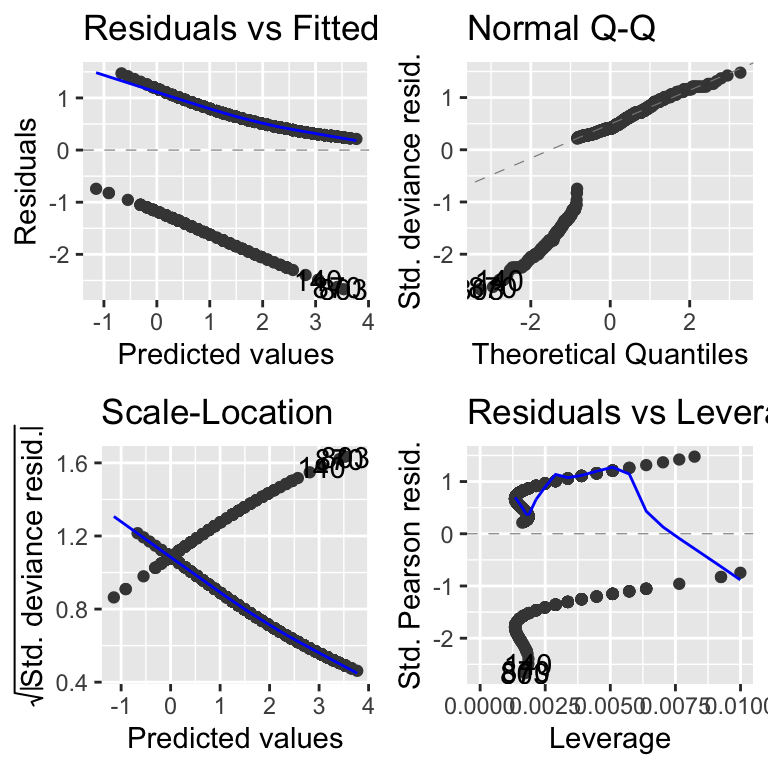
Given these limitations, it is often better to avoid relying heavily on traditional diagnostic plots for logistic regression. Instead, it is more prudent to evaluate your model choice based on theoretical principles, particularly those addressing the bounded nature of the response variable.
However, a newer diagnostic method specifically suited to models like logistic regression exists: the DHARMa package offers an alternative simulation-based approach that provides clearer and more reliable insights.
22.2.1 DHARMa
The DHARMa package is an alternative approach to model diagnostics, particularly where traditional tools like ggfortify::autoplot fall short, especially for models involving non-Gaussian data types such as binomial or Poisson distributions. These types of data often challenge standard diagnostic methods, making interpretation difficult.
At the heart of DHARMa’s approach is the simulateResiduals() function. The function simulates standardised residuals based on the model’s assumptions, including the specified error distribution and link function. DHARMa then constructs diagnostic plots that can reveal model deficiencies such as mismatched link functions, unmodelled predictors, and overdispersion.
The two plots are the Q-Q plot and the residuals versus predicted values plot. The Q-Q plot compares the observed residuals against an expected distribution generated from the simulations. A well-fitted model is reflected by points aligning along the diagonal. The residuals versus predicted values plot allows users to check for patterns in residuals, with a random scatter indicating a well-fitting model. Deviations from these expectations signal issues like incorrect link functions, overdispersion, or omitted variables.
Here is how to implement this approach (note that you will likely need to install the DHARMa package first using install.packages("DHARMa")):
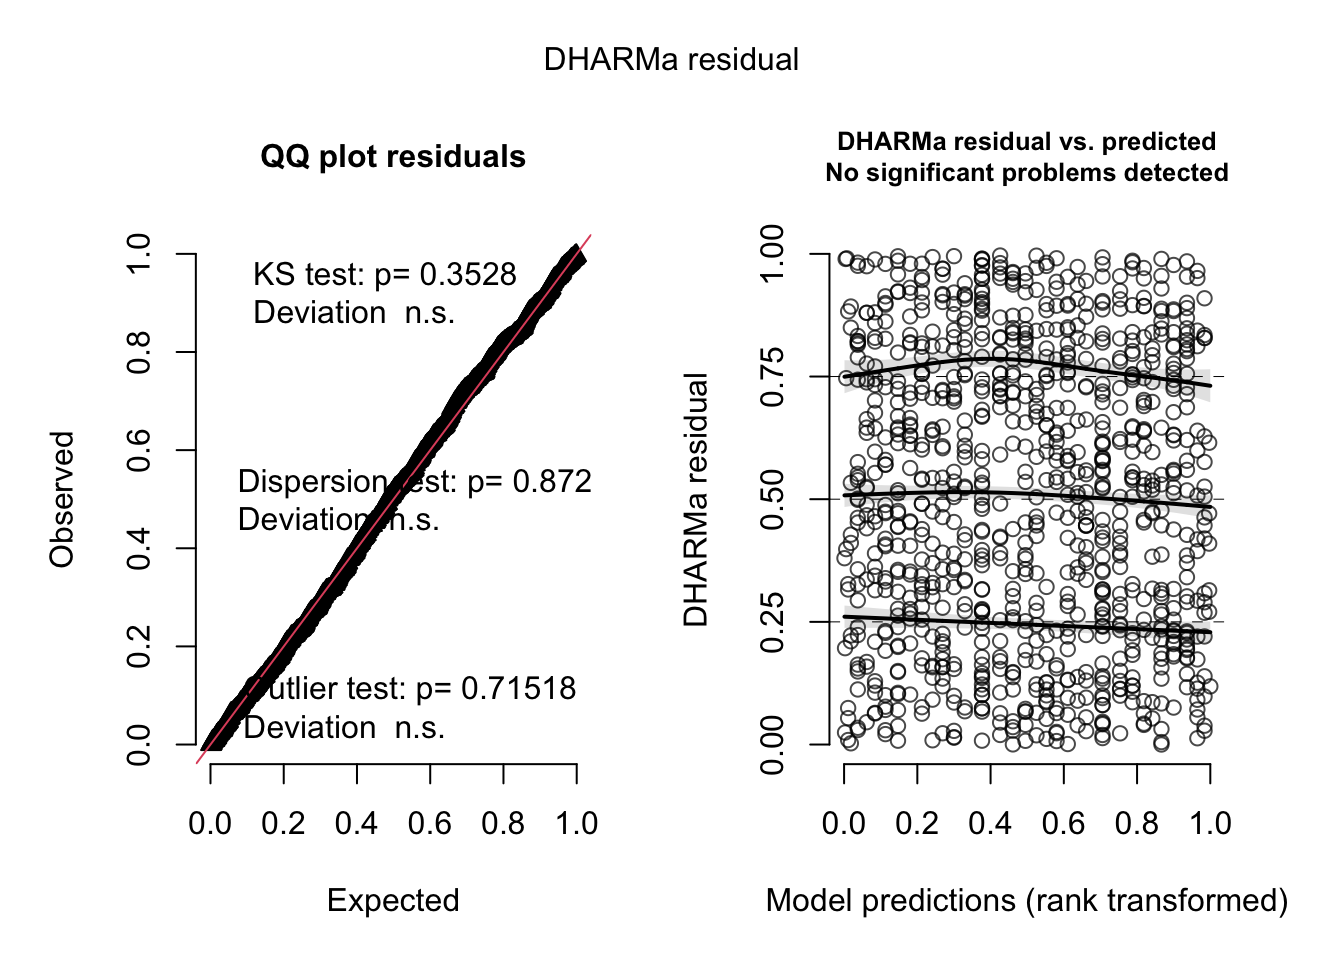
The text on the Q-Q plot reports the results of three tests: the KS test, Dispersion test, and Outlier test, each targeting specific aspects of model fit. The KS (Kolmogorov-Smirnov) test checks whether the distribution of residuals aligns with the expected distribution, flagging deviations that suggest model misspecifications. The Dispersion test evaluates whether the variance in the residuals matches the model’s assumptions, identifying overdispersion or underdispersion. Finally, the Outlier test highlights residuals that fall outside expected ranges, pointing to potential anomalies or influential data points. Together, these tests provide a comprehensive diagnostic of model performance and in this case indicate that there are no problems.
As you can see, the two plots, and the in-built tests, indicate that the model structure is appropriate: The observed and expected points fall on the QQ diagonal line and the residuals versus predicted values plot looks like a random star-field without any patterns.
This example illustrates a general principle. DHARMa is a reliable, general-purpose diagnostic tool for GLMs. Because it works by simulation, it produces trustworthy residuals whatever the error family (binomial, Poisson, and so on) and whatever the structure of the data. The traditional autoplot diagnostics, by contrast, become less and less reliable as the response data become more discrete. They are perfectly readable for ordinary linear models and remain acceptable for GLMs with aggregated or high-count responses, but they can be very misleading for binary (0/1) data like the NFL field goals. The reason is that, for binary data, the residual at any given fitted value can only take one of two possible values, so the Q-Q plot looks alarming even when the model is perfectly appropriate — which is exactly what we saw with autoplot(nflMod) earlier.
Which diagnostic when?
-
autoplot(deviance residuals): fine for ordinary linear models, and acceptable for GLMs with aggregated or high-count data (e.g. grouped binomialcbinddata, or Poisson counts that are not dominated by zeros). -
DHARMa(simulated residuals): reliable for all GLMs. Essential for binary (0/1) data, whereautoplotcannot be trusted.
When in doubt, use DHARMa. If autoplot and DHARMa agree,
you can be confident; if they disagree, believe DHARMa.
22.2.2 Continuing the analysis
So, based on theoretical principles about the response variable’s bounds or the results of this DHARMa analysis, we can be pretty sure that the binomial family is the most appropriate family to use. Let’s continue.
We proceed in the normal way by obtaining the ANOVA table for the model. We need to specify that we want to calculated p-values using a “Chi” squared test. This shows us that indeed distance is an important variable in determining probability of success (not so surprising!)
## Analysis of Deviance Table
##
## Model: binomial, link: logit
##
## Response: Success
##
## Terms added sequentially (first to last)
##
##
##          Df Deviance Resid. Df Resid. Dev  Pr(>Chi)
## NULL                       947     955.38
## Distance  1    137.8       946     817.58 < 2.2e-16 ***
## ---
## Signif. codes:  0 '***' 0.001 '**' 0.01 '*' 0.05 '.' 0.1 ' ' 1
We get more useful information from the coefficient summary of the model. This gives the intercept and slope of the model on the scale of the linear predictor (see the figure above).
##
## Call:
## glm(formula = Success ~ Distance, family = binomial, data = NFL)
##
## Coefficients:
##             Estimate Std. Error z value Pr(>|z|)
## (Intercept)  5.68958    0.45021   12.64   <2e-16 ***
## Distance    -0.13118    0.01263  -10.38   <2e-16 ***
## ---
## Signif. codes:  0 '***' 0.001 '**' 0.01 '*' 0.05 '.' 0.1 ' ' 1
##
## (Dispersion parameter for binomial family taken to be 1)
##
##     Null deviance: 955.38  on 947  degrees of freedom
## Residual deviance: 817.58  on 946  degrees of freedom
## AIC: 821.58
##
## Number of Fisher Scoring iterations: 5
We could report this something like this:
The binomial GLM showed that distance was significantly associated with the probability of goal success (GLM: Null Deviance = 955.38, Residual Deviance = 817.58, d.f. = 1 and 946 p <0.001). The slope and intercept of the relationship is -0.131 and 5.690 respectively on the logit scale. The equation of the best fit line was therefore logit(pSuccess) = 5.690 - 0.131\(\times\)distance (see Figure XXX)
The equation of the model if you want to express it on the natural scale works out to be:
\(y =\frac{1}{1+exp(-(\beta_0 + \beta_1 x))}\), or \(probability =\frac{1}{1+exp(-(5.690 - 0.131\times distance))}\).
Let’s make sure that works by creating a set of predicted data from this equation and plotting it onto the graph:
d1 <- data.frame(x = 10:50) %>%
  mutate(y = 1 / (1 + exp(-(5.690 - 0.131 * x))))
A + geom_line(data = d1, aes(x, y), colour = "red")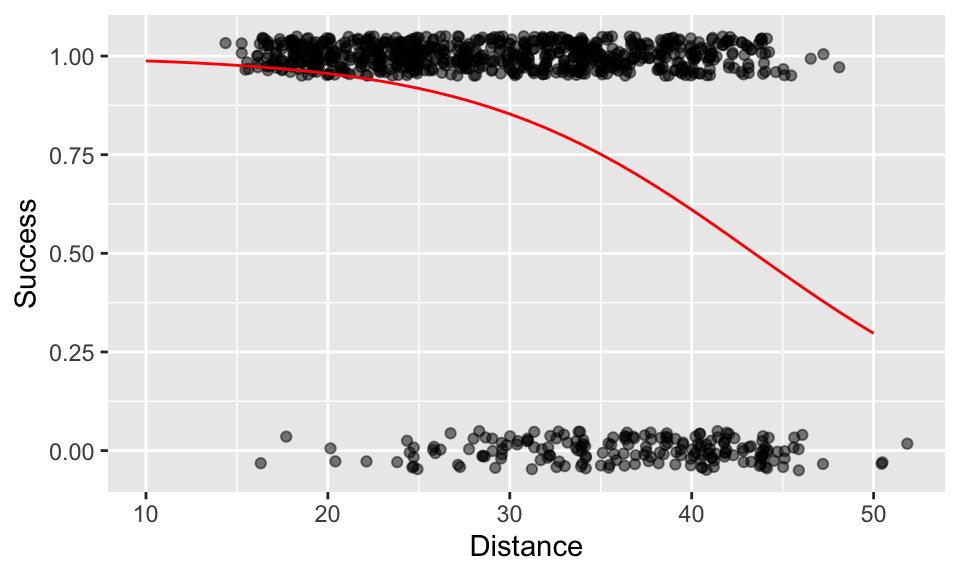
Rather than using the equation, there is an easier way by using the R’s predict function. This was covered in the previous chapter, but for convenience, here are the steps:
create a data frame for the model what to predict
from.use the
predictfunction to predict fitted values and standard errors (SE).put these predicted values into a
newDatadata frame, multiplying the SE values these by 1.96 to get the 95% confidence intervals of the fitted values.back-transform the fitted values to the natural scale using the appropriate “inverse” of the link function.
So, this how to do it in this case. First we obtain the predictions and CI on the scale of the linear predictor (logit scale). We calculate 95% CI from the standard errors simply by multiplying by 1.96.
# Dataset to predict FROM
newData <- data.frame(Distance = 14:52)

# Get predictions from the model
predVals <- predict(nflMod, newdata = newData, se.fit = TRUE)

# Add those predictions to newDat
newData <- newData %>%
  mutate(fit_LP = predVals$fit) %>%
  mutate(lowerCI_LP = predVals$fit - 1.96 * predVals$se.fit) %>%
  mutate(upperCI_LP = predVals$fit + 1.96 * predVals$se.fit)
Now we can first obtain the inverse link from the model object family(nflMod)$linkinv, and use that to backtransform the data onto the natural scale ready for plotting.
# Get the inverse link function
inverseFunction <- family(nflMod)$linkinv

# transform predicted data to the natural scale
newData <- newData %>%
  mutate(
    fit = inverseFunction(fit_LP),
    lowerCI = inverseFunction(lowerCI_LP),
    upperCI = inverseFunction(upperCI_LP)
  )
Now we can finally plot the model predictions and the 95% confidence intervals for them.
# The plot and ribbon
(A <- ggplot(NFL, aes(x = Distance, y = Success)) +
  geom_ribbon(
    data = newData, aes(x = Distance, ymin = lowerCI, ymax = upperCI),
    fill = "grey75", alpha = 0.5, inherit.aes = FALSE
  ) +
  geom_line(data = newData, aes(x = Distance, y = fit)) +
  geom_jitter(height = 0.05, alpha = 0.5))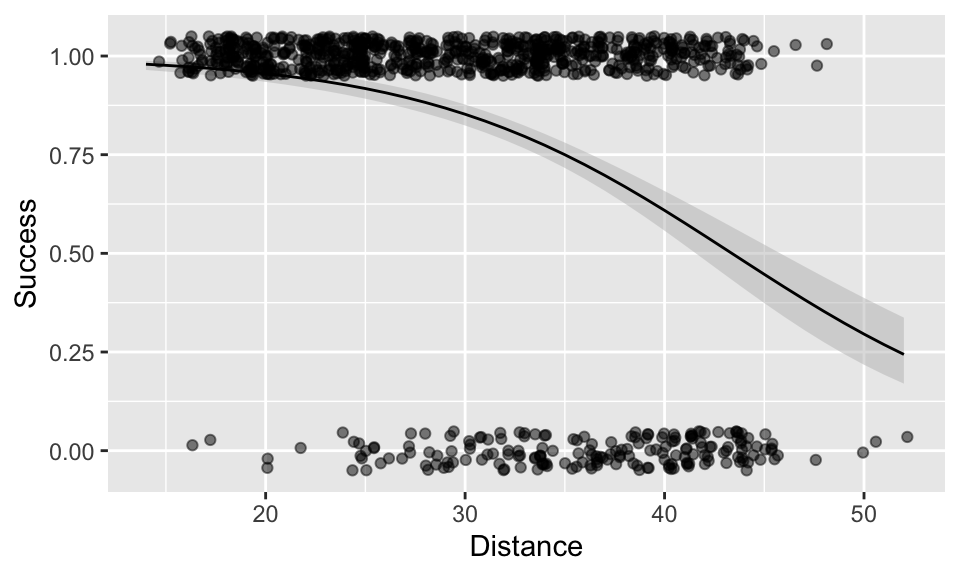
So, at what distance does the probability of success fall to just 50%? You could read this directly from the plot as “approximately 44m”. Alternatively, you could obtain the value from the newData dataset you created above with predictions from the model, by filtering it. This confirms the probability of success reaches 0.5 somewhere between 43-44m.
##   Distance       fit
## 1       42 0.5449184
## 2       43 0.5122432
## 3       44 0.4794630
22.3 Example: Sex ratio in turtles
In this example we will look at sex ratio of hawksbill turtles (Eretmochelys imbricata)13. The data are counts of males and females in clutches of eggs incubated at different temperatures.
The sex ratio in the species varies with temperature during incubation. We are interested in what the “tipping point” temperature is between male-female biased ratios.
This is a small dataset, you can look at the whole thing:
##   Temperature Total Nmale Nfemale
## 1        27.9    12    12       0
## 2        28.4    29    29       0
## 3        28.9    31    26       5
## 4        29.3    20    18       2
## 5        29.5    22    14       8
## 6        29.8    10     2       8
## 7        30.4    10     0      10
We are interested in sex ratio which we can calculate as the proportion of the population that is female (i.e. number of females divided by total number).
Let’s plot that data. We can use the trick of telling R to plot the points different sizes depending on the sample size (using the size = argument):
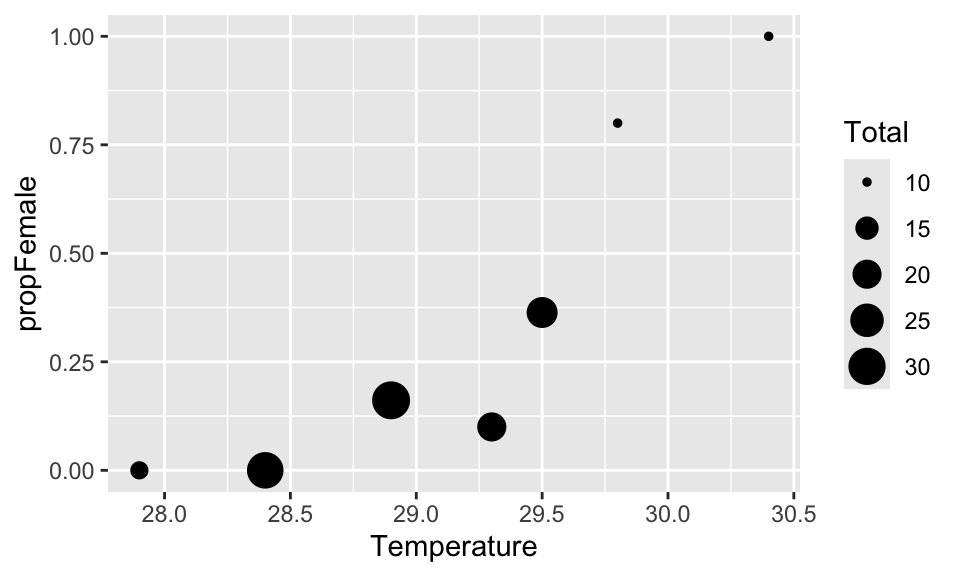
You can see that the proportion of females increases with temperature. Let’s fit a model to these data to better understand them. We could use the propFemale data as the response variable, but there is a big problem with that: we would be giving equal weight to each of the data points, even though the sample size for each one ranges from 10 to 31 This is not good because we would have much more faith in the very large sample sizes than the small ones.
Instead we can bind the data into a two column matrix using cbind. The first column is our “success” and the second column is our “failure”. If we put females in the first column the model will predict “probability of being female”, which is what we want. This two-column approach provides the model with the sample size which it can use to weight the regression appropriately.
Now lets fit the model.
As ever, we should take a quick look at the model diagnostic plots. Note the important difference from the NFL example: these turtle data are aggregated binomial data (each row summarises many individual turtles via cbind), rather than binary 0/1 data. As explained in the “Which diagnostic when?” box above, this is exactly the situation where the traditional autoplot deviance-residual plots are trustworthy — and here they look fine.
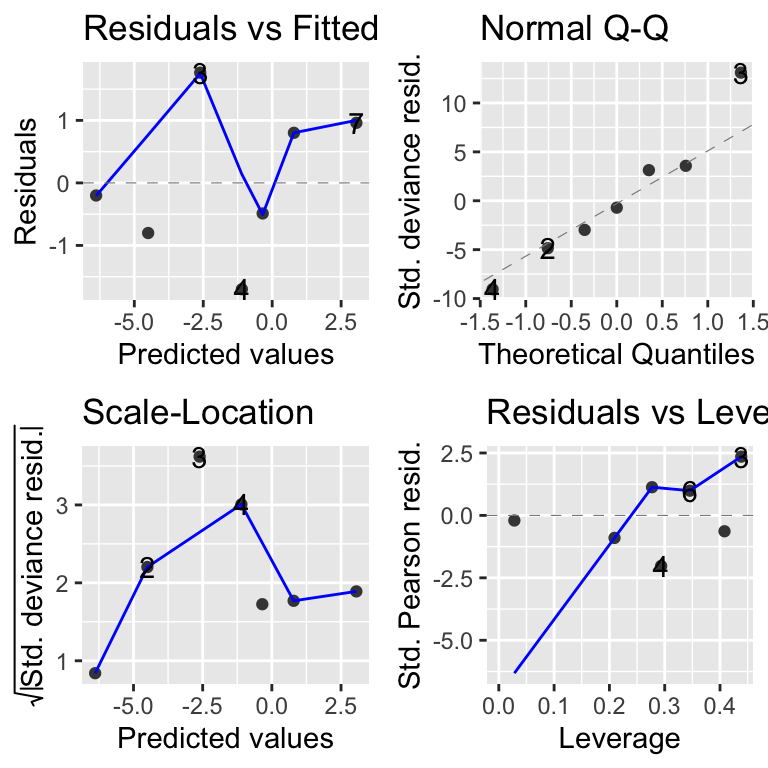
To confirm this, we can also check the model with DHARMa.
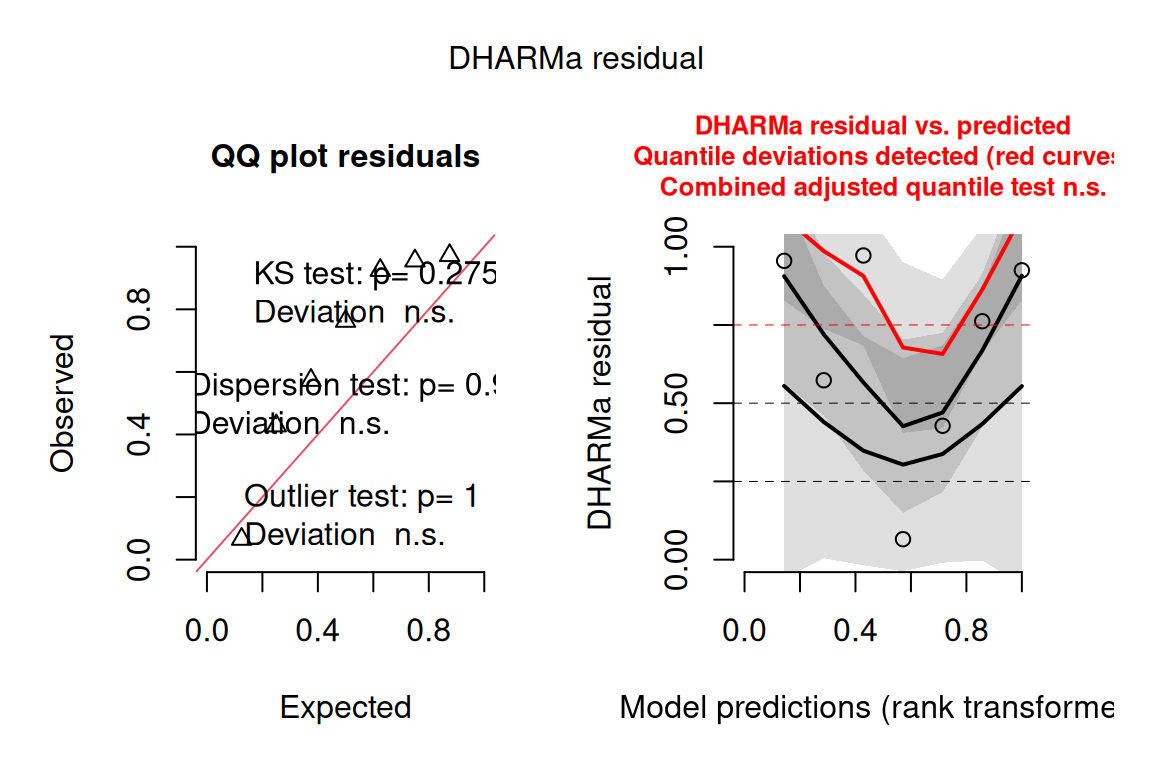
The three formal tests all pass: the KS test, the dispersion test, and the outlier test are each non-significant, so DHARMa agrees with autoplot that the binomial model is appropriate. The non-significant dispersion test is especially reassuring — it tells us the data are not overdispersed. You will, however, notice that the right-hand panel highlights a “quantile deviation” in red. Don’t panic: the combined adjusted quantile test (reported at the top of that panel) is itself non-significant, and with such a tiny dataset (only 7 rows) DHARMa’s quantile lines are very easily wiggled by one or two points, so an isolated red flag like this should not be over-interpreted. The contrast with the NFL example is the instructive part: there, autoplot and DHARMa genuinely disagreed and DHARMa was the one to trust; here both tools agree the model is fine, and the lone red flag is a small-sample artefact rather than a real problem.
Now we can look at the anova table. This will tell us what we already know - there is a strong effect of temperature on sex ratio.
## Analysis of Deviance Table
##
## Model: binomial, link: logit
##
## Response: y
##
## Terms added sequentially (first to last)
##
##
##             Df Deviance Resid. Df Resid. Dev  Pr(>Chi)
## NULL                            6     70.353
## Temperature  1   61.869         5      8.484 3.671e-15 ***
## ---
## Signif. codes:  0 '***' 0.001 '**' 0.01 '*' 0.05 '.' 0.1 ' ' 1
Now for the coefficients:
##
## Call:
## glm(formula = y ~ Temperature, family = binomial, data = hawksbill)
##
## Coefficients:
##              Estimate Std. Error z value Pr(>|z|)
## (Intercept) -111.7200    22.4260  -4.982 6.30e-07 ***
## Temperature    3.7754     0.7625   4.951 7.37e-07 ***
## ---
## Signif. codes:  0 '***' 0.001 '**' 0.01 '*' 0.05 '.' 0.1 ' ' 1
##
## (Dispersion parameter for binomial family taken to be 1)
##
##     Null deviance: 70.3528  on 6  degrees of freedom
## Residual deviance:  8.4841  on 5  degrees of freedom
## AIC: 24.184
##
## Number of Fisher Scoring iterations: 5
This table gives us the coefficients for the formula of our relationship. We could use these to produce a formula of the form \(y =\frac{1}{1+exp(-(\beta_0 + \beta_1 x))}\).
It is perhaps more useful to plot the model fit onto the plot. First we need to create a data frame to predict from:
Now we can predict the values (and 95% CI) on the scale of the linear predictor (logit).
pv <- predict(modA, newDat, se.fit = TRUE)
newDat <- newDat %>%
  mutate(
    propFemale_LP = pv$fit,
    lowerCI_LP = pv$fit - 1.96 * pv$se.fit,
    upperCI_LP = pv$fit + 1.96 * pv$se.fit
  )
Now we can use the inverse link function to backtransform to the natural probability scale.
# Get the inverse link function
inverseFunction <- family(modA)$linkinv

# transform predicted data to the natural scale
newDat <- newDat %>%
  mutate(
    propFemale = inverseFunction(propFemale_LP),
    ymin = inverseFunction(lowerCI_LP),
    ymax = inverseFunction(upperCI_LP)
  )
We can add these values to the plot like this:
# The plot and ribbon
(A <- ggplot(hawksbill, aes(
  x = Temperature, y = propFemale,
  size = Total
)) +
  geom_ribbon(
    data = newDat, aes(x = Temperature, ymin = ymin, ymax = ymax),
    fill = "grey75", alpha = 0.5, inherit.aes = FALSE
  ) +
  geom_smooth(
    data = newDat, aes(x = Temperature, y = propFemale),
    stat = "identity", inherit.aes = FALSE
  ) +
  geom_point())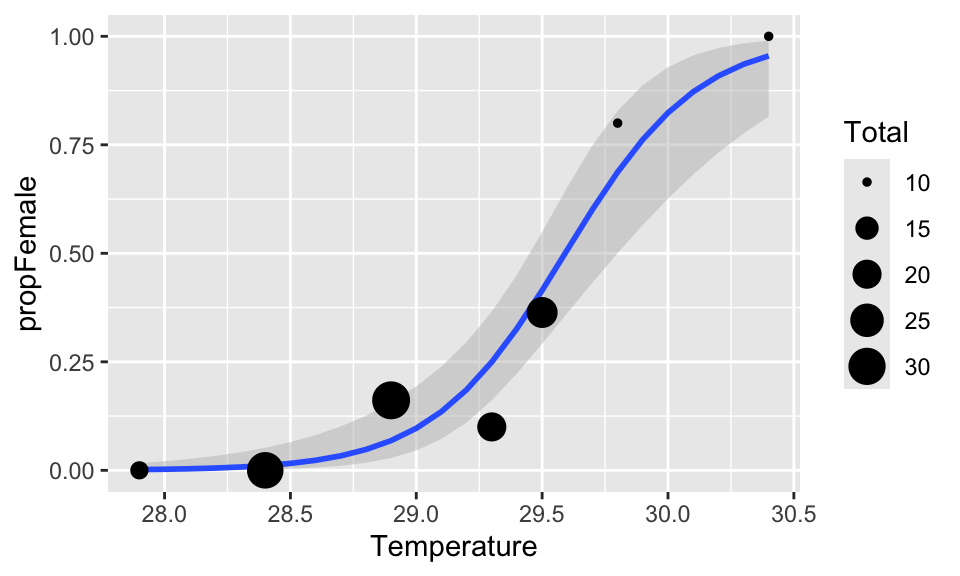
Can you give read off the graph the approximate estimated temperature at which sex ratio is 50:50?
Try refitting the model using simply the proportion female
(propFemale) data rather than the two-column
(cbind) approach. Then try writing up the result in the
same way as shown for the NFL field goals example.
22.4 Example: Smoking
As I mentioned above binomial regression can be applied to anything where there data can be classified into two groups. I’ll illustrate that now with an example about smoking.
The data set is very small and looks like this:
| Student smokes | Student does not smoke | |
|---|---|---|
| Parent(s) smoke | 816 | 3203 |
| No parents smoke | 188 | 1168 |
The dataset is the number of students smoking and not smoking grouped according to whether their parents smoke. These data are binomial/proportion data because the values in the cells of the table are constrained by the overall total and students must fall into one of the categories. We can use these data to calculate the probability of the student being a smoker.
Before fitting a GLM lets just work out these probabilities by hand. What is the probability that a child of smoking parents is a smoker themselves? This is simply 816/(816+3203) = 0.2030. (i.e. it is the number of smokers divided by the total number). Similarly, the probability that the child of non-smokers smokes is 188/(188+1168) = 0.1386.
But is this a significant difference? That is what we are trying to find out using a GLM.
To do this, we can turn these data into a two column matrix of success (yes - smoker) and failure (no - non-smoker).
##      1_yes 0_no
## [1,]   816 3203
## [2,]   188 1168
So we can see “success” on the left and “failure” on the right”.
We now create a (tiny) data.frame for the parental status (smoker = “1_yes”, non-smoker = “0_no”).
Now we can fit the model. Pause now and think about what the NULL hypothesis is here. It is that parental smoking does not have any influence on whether the child smokes, and that the probability that the student smokes is unrelated to parental smoking.
With such a small dataset, diagnostic plots will not tell us anything useful so there’s no point in doing them for this case.
As usual, we first ask for the (Analysis of Deviance table using anova.
## Analysis of Deviance Table
##
## Model: binomial, link: logit
##
## Response: y
##
## Terms added sequentially (first to last)
##
##
##             Df Deviance Resid. Df Resid. Dev  Pr(>Chi)
## NULL                            1     29.121
## parentSmoke  1   29.121         0      0.000 6.801e-08 ***
## ---
## Signif. codes:  0 '***' 0.001 '**' 0.01 '*' 0.05 '.' 0.1 ' ' 1
This tells us that the status of the parents (whether they smoke or not) is highly significant: it explains a lot of the pattern that we see in the data.
We can find out what this pattern is by examining the summary table.
##
## Call:
## glm(formula = y ~ parentSmoke, family = binomial, data = smoke)
##
## Coefficients:
##                  Estimate Std. Error z value Pr(>|z|)
## (Intercept)      -1.82661    0.07858 -23.244  < 2e-16 ***
## parentSmoke1_yes  0.45918    0.08782   5.228 1.71e-07 ***
## ---
## Signif. codes:  0 '***' 0.001 '**' 0.01 '*' 0.05 '.' 0.1 ' ' 1
##
## (Dispersion parameter for binomial family taken to be 1)
##
##     Null deviance: 2.9121e+01  on 1  degrees of freedom
## Residual deviance: 1.7186e-13  on 0  degrees of freedom
## AIC: 19.242
##
## Number of Fisher Scoring iterations: 2
This shows us the estimates on the logit scale. We can use predict to get a sense for these predictions on the more intuitive probability scale.
First we calculate the fitted values and 95% confidence intervals on the scale of the linear predictor (logit):
pv <- predict(smokeMod, smoke, se.fit = TRUE)
smoke <- smoke %>%
  mutate(
    prob_LP = pv$fit,
    lowerCI_LP = pv$fit - 1.96 * pv$se.fit,
    upperCI_LP = pv$fit + 1.96 * pv$se.fit
  )
Then we can backtransform these values to the probability scale using the inverse link function:
# Get the inverse link function
inverseFunction <- family(smokeMod)$linkinv

# transform predicted data to the natural scale
smoke <- smoke %>%
  mutate(
    prob = inverseFunction(prob_LP),
    ymin = inverseFunction(lowerCI_LP),
    ymax = inverseFunction(upperCI_LP)
  )
smoke
## parentSmoke prob_LP lowerCI_LP upperCI_LP prob ymin ymax
## 1 1_yes -1.367429 -1.444287 -1.290570 0.2030356 0.1908823 0.2157563
## 2 0_no -1.826606 -1.980629 -1.672583 0.1386431 0.1212518 0.1580801This table shows us that the probability of the students smoking is 0.2030 (95% CI = 0.191-0.216) for children of smokers, and 0.139 (95% CI = 0.121-0.158) for children of non-smokers. We can plot this using ggplot like this.
ggplot(smoke, aes(
  x = parentSmoke, y = prob, ymin = ymin,
  ymax = ymax
)) +
  geom_point() +
  geom_segment(aes(xend = parentSmoke, y = ymin, yend = ymax))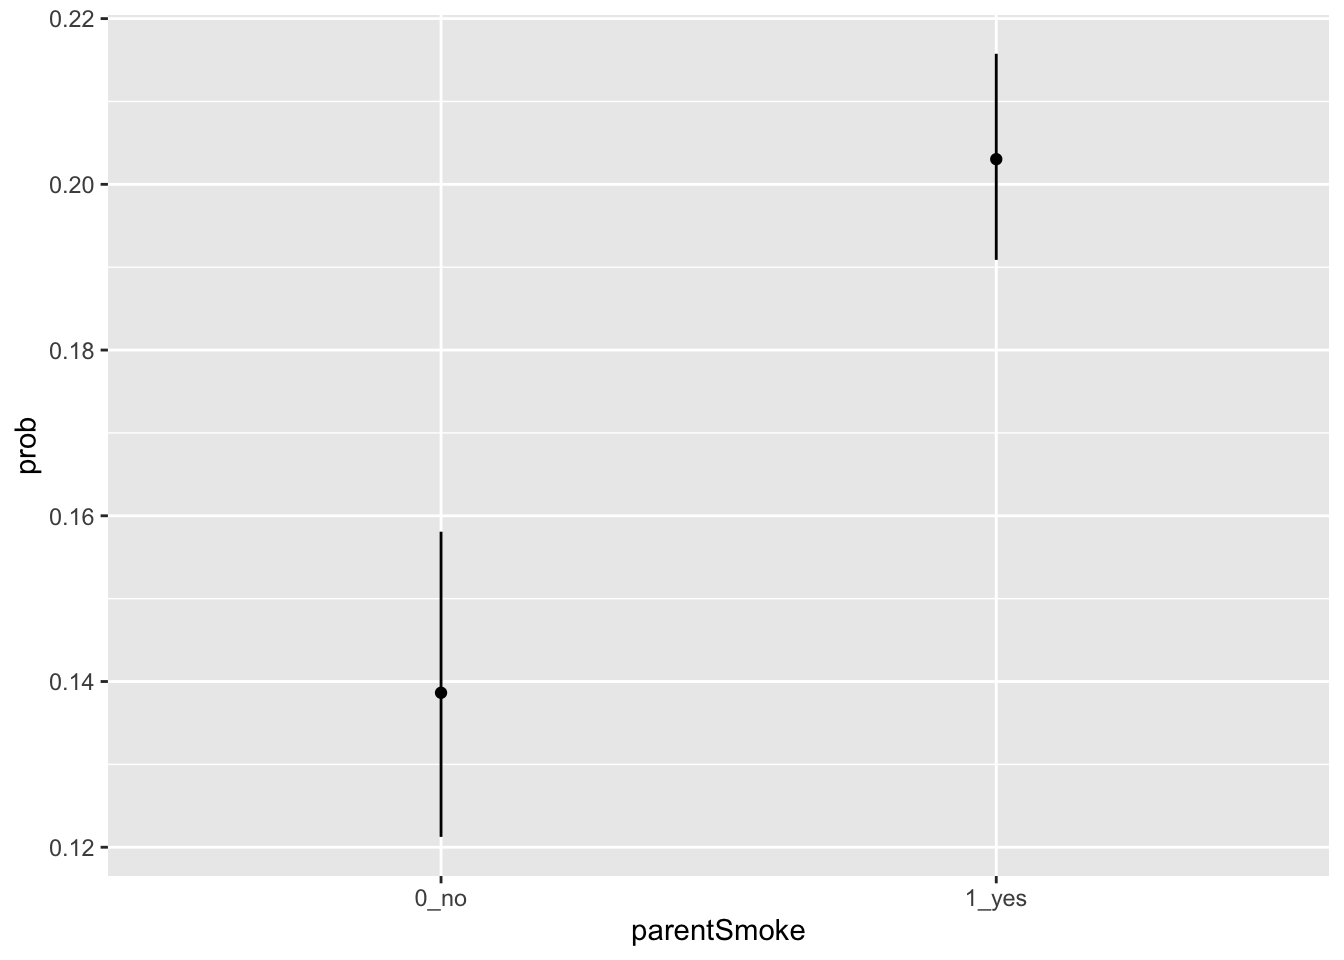
22.5 Overdispersion in binomial models
Just as count data modelled with Poisson errors can suffer from overdispersion, so can binomial data. Recall from the previous chapter that overdispersion occurs when the response varies more than the error family assumes, and that it is often caused by an important variable being left out of the model, or by non-independent (clustered) observations. Exactly the same problem, with the same causes, can affect a binomial GLM.
Two points are worth emphasising for the binomial case:
- It only applies to aggregated binomial data — that is, proportion data or a two-column
cbind(successes, failures)response, like the turtle and smoking examples. Overdispersion cannot be diagnosed from binary (0/1) data such as the NFL field goals: with only a single trial per row the residual deviance carries no information about dispersion, so the usual checks are meaningless. Overdispersion is only a concern when each row summarises several trials. - How to detect it. The methods are the ones you already know. You can use the DHARMa dispersion test (as we did for the turtles, where it was comfortably non-significant), or the “rule of thumb” of dividing the residual deviance by its degrees of freedom and checking whether the result is much greater than 1 (a value above about 2 is a warning sign).
What to do when it is detected. The fix mirrors the Poisson case. Refit the model exactly as before, but replace family = binomial with family = quasibinomial. The quasibinomial family estimates a dispersion parameter and widens the standard errors (and therefore the p-values) accordingly, while leaving the coefficient estimates themselves unchanged. Because a dispersion parameter is now being estimated, you should assess significance with an F test rather than the chi-squared test (i.e. anova(model, test = "F")). The negative-binomial and zero-inflation options mentioned in the previous chapter are specific to count data, but the quasi-likelihood idea carries over directly to binomial data through the quasibinomial family. The net effect, as with quasi-Poisson, is a more honest and more cautious picture of how certain you can be about the relationship.
22.6 Exercise: Forensic footprints
A crime has been committed. At the scene, investigators recover a single clear footprint, and from it a forensic technician estimates that the person who left it had a foot length of 271 mm. Was the culprit male or female?
To answer this, you have access to a reference database, morphometry.csv, containing measurements from 155 people of known sex. For each person the data record their Sex (Male or Female) and three body measurements in millimetres: Height, HandLength and FootLength. Your job is to build a “forensic tool” - a binomial GLM (logistic regression) that predicts sex from foot length - evaluate how accurate it is, and then use it to make a prediction about the person who left the print.
This is the kind of binary (Male vs. Female) single-predictor problem you saw in the NFL field goals example, so use that worked example as your template. Unlike the examples above, this one is not worked through for you - figure out the steps yourself, and ask for help if you get stuck.
- Import the reference data. Your response variable needs to be binary (0/1), so create a new column that is
1when the person is male and0when they are female (ifelseis one way to do this). You will therefore be modelling the probability of being male. - Plot the data (
geom_jitterworks well here - remember to adjust theheightandalphaarguments as in the NFL example). - Fit an appropriate binomial GLM predicting your 0/1 variable from
FootLength. - Check the model using
DHARMa(simulateResiduals). Does the binomial family look appropriate? - Get the analysis of deviance table (
anovawithtest = "Chi") and thesummarytable. Is foot length a significant predictor of sex? (Remember the coefficients are on the logit scale.) - How good is your forensic tool? Use the model to predict the probability of being male for everyone in the reference database (
predictwithtype = "response"), classify each person as male if that probability is greater than 0.5, and compare your classification with their true sex. What proportion of people does your tool classify correctly? - The crime scene. Use
predictto estimate the probability (and its 95% confidence interval) that a person with a foot length of 271 mm is male. What is your conclusion, and how confident are you? Would this be strong enough evidence to present in court? - A second, fainter print at the scene suggests a foot length of about 249 mm. Predict the probability of being male for this print too. Why is it much harder to draw a conclusion here? (Think about the foot length at which the probability of being male is 0.5.)
data from: Godfrey et al. (1999) Can. J. Zool. 77: 1465–1473↩︎